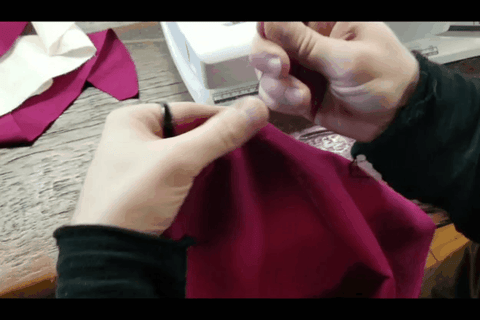
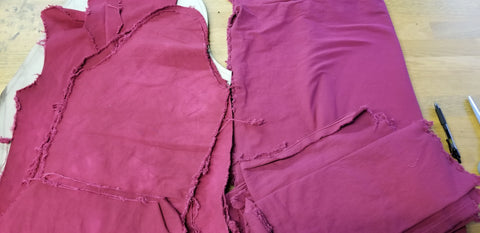
To minimize any potential sanding mistakes, I switched from the dremel to medium grit sandpaper. While not practical for bulk sanding, it allows much better finishing work because you can chip away any imperfections in your edges without accidentally burrowing too deep. I used Kwik Seal to fill in any dips or wounds in the armor, and I found that the fine-grit sandpaper works on it once it fully dries.
As I sanded the initial layer smooth, I found that some areas needed additional layers of Kwik Seal to really give a nice even finish.
After some patience and elbow grease, the foam armor pieces are much smoother and clean around the edges and seams. It should be ready for another try with our HVLP paint gun.
There’s still a bit of work to do after we’ve sealed and painted our armor, so we can’t show off the final costume just yet. But you can be certain that this project will see completion and get a proper photoshoot before too long!
Thank you all for following our work throughout this series. We wish you all the best in your own winter endeavors, and we will see you next time!
Sometimes as you get to the end of a project you start noticing missing details. I had to backtrack and make the wing spikes for the knee guards. I decided to make them two layers to allow more depth with the bevels and curvature.
In order for Harl to continue working on the details of the bodysuit, we needed to mark where the leg armor would go. So we placed them on her while wearing the suit and took reference pictures and notes.
While we were looking at the armor, we decided that the hip plates would benefit from adding a bevel to the edges. So I marked them and dremel sanded them.
To attach the leg armor to the bodysuit, we’re going to use sew on purse magnets. One half of the magnets are flat, but the other half is about ¼” thick. To get the armor to lay flat against the fabric, I decided to trace and dremel pockets into the inside of the armor. Once I dremelled deep enough, the thicker magnet halfs fit in perfectly! I super glued them into place, and then added a little extra super glue over the corners.
Now onto the fun part! We’re going all out with this armor and using an HVLP (high volume, low pressure) spray gun to seal and paint our parts. These can be a bit of an investment, but if you plan to make a lot of armor or props and want your paint to go on smoothly, an HVLP will outperform rattle can spray paints any day of the week. You can find parts for them at home improvement stores or online.
Some of the sealants we’re working with are highly toxic, so we use a spray booth and wear respirators to be safe.
This was uncharted territory for me, but we were lucky enough to have helpful advice from Jarman Props along the way. He made the 3D printed armor parts, and has many years of expertise in professional painting.
To start out, we are using a highly flexible gloss coating to seal the EVA foam. Since I haven’t worked with it before, I test it out on a scrap of foam first. The key to learning any paint process is to test it out on scraps before you move on to your finished armor pieces.
A great idea when putting multiple coats of anything onto your armor is to keep a tally of your coats as you go. It can help you find a balance for your seal, or the right amount of color if your paint isn’t as opaque. And it can keep you from forgetting if you are multitasking, which will be pretty common for me as I wait for each coat to dry.
Jarman recommended one light coat, one medium coat, and a couple of heavier coats to seal our foam up. Here’s how it looked from start to finish.
After I practiced on a few scraps I became comfortable enough to begin coating the rest of the foam pieces. This will take time and patience to do properly, so I will have to wait until next week to show you pictures of all the armor together.
So with that said, we still have to Bondo, sand, and primer a couple of 3D printed pieces, and then we can get into the final painting stages for all of our armor. Tune in next week for our last blog post!
]]>Sometimes, despite our best efforts, we’ll have seams that need some cleaning up. Luckily, you can still salvage seams like this with a little bit of dremel sanding and Kwik seal caulk.
First, lightly dremel the edges of the seam. Sometimes this will fix the problem on its own, but in this case, it simply ensures that both sides of the seam are even before we fill in the gap.
Pick up some Kwik seal caulk from your local hardware or home improvement store. You can usually find it in the painting supplies area.
Use just a tiny bit at a time, and smooth it out across the gap in your seam. Be sure to read and follow the instructions on the bottle before use. Once it’s completely dry, your piece is ready to be sealed and painted!
Moving on to the leg armor pieces, we had previously started them out by cutting multiple layers of foam out and gluing them together. Notice that I went ahead and laser cut a centerline on the top layer to act as my guide for the bevels.
Before we get to sanding, I like to get a head start by cutting some of the excess foam away with a box cutter. If you do this, make sure to leave 2-3mm of foam from the edges as a safety so you don’t accidentally cut away too much. I also recommend cutting a little at a time to maintain control as you cut. And of course, always cut away from yourself so that you’re less likely to slip up and cut off a finger ;)
From here, dremelling the bevel is largely the same process that I went over in Blog #05. One thing I like about sanding a shape comprised of multiple layers is that you can use the seam lines as guidelines while you dremel. On average the seam should look centered between the two edges of the bevel, except for the ends of the shape where it tapers off.
After you do some initial sanding, feel the edge with your finger. Sometimes imperfections can be hard to see on EVA foam, but you can definitely feel them. When you find a bump or a dip in your edge, start with focused strokes on the elevated area and lengthen them out as you go to help even out the entire edge. Always be sure to sand your edges slowly with many shallow strokes rather than trying to dig into it. Gradually sanding away a little at a time will help to minimize imperfections and mistakes.
Here’s a look at the finished shapes. Next, we need to attach a few layers together and heat shape them.
When gluing layers together, it’s a good idea to make a pattern to draw your guidelines so that both sides will layer the same way.
Once you’re ready to heat form your shapes, hit them with a heat gun until you see the color of the foam change slightly and smooth out. It may have a slight glistening look to it, but don’t heat any one spot for too long or it may start to melt. If you haven’t used a heat gun before, practice on scraps before working with your final piece.
While your piece is heated, curl it up and hold it still for a minute while it cools down. I like to exaggerate the curvature on limb armor so that it will hug your body. Over time it may relax a bit, especially if it is left in a hot room or car for extended periods of time. It can always be reheated and reshaped as long as the paint used on the outside doesn’t react badly to heat (always do research or test to be safe)
Thank you for tuning in, and be sure to check back with us next week as we begin sealing and painting the foam. We’re getting close to the finish line!
]]>So to begin, let's take a look at our two primary glues to use with EVA foam. The first choice glue will usually be Contact Cement due to its durability, flexibility, and ease of application. The second type of glue commonly used is Cyanoacrylate, but most of you will know it more commonly as Super glue. You can use other glues with EVA foam, but I use these because they both provide a fast and strong bond. I’ll demonstrate the pros and cons of each glue as we assemble the armor.
But before we can use them, we have to buy them right? You can typically find both glues at any hardware store in the glue section, which is usually found within the paints area. Barge and Weldwood are common brands of contact cement, but you will want to make sure “contact cement” is on the can, because it functions differently than normal glues. Cyanoacrylate only comes in tiny bottles in stores, but you can also find it in much larger bottles online. Just make sure you are searching for “Cyanoacrylate” rather than “super glue” if you want to find the big bottles. My favorite brand is Bob Smith Industries, because they also sell an accelerator to help bond the edges of our Lumin's Workshop eva foam more quickly.
Before you begin using Contact Cement, first make sure your work environment is well ventilated and temperature controlled. Outside is great in warm weather, but in colder seasons you will want to have a room with a painting booth, or windows open and fans to take your fumes outside. You may also want to wear a respirator while applying the glue, just to be safe. Contact Cement is pretty messy to clean up, so be sure to also cover your workspace with a tarp, cardboard, or heavy paper. If you need to clean up any glue, you can use mineral spirits or Acetone.
Contact Cement is exactly what it sounds like, it bonds to itself instantly and permanently. I can count on one hand how many times I was able to pull apart two pieces that got misaligned while gluing without tearing the foam. Because of this, we will want to mark our edges with corresponding numbers and guide marks to ensure clean and uniform seamlines. The guide marks are especially important when you are making matching pairs of armor for your arms and legs, or mirrored seams in larger pieces.
Coat both pieces you want to bond together with a generous first coat and let them set for a good 15 minutes or so. The first coat tends to soak into the foam, so I recommend applying a second coat afterwards. If you plan out ahead of time you can potentially coat enough pieces so that by the time you finish applying the first coat to all of them, your first pieces are ready for the second.
You can tell when the pieces are ready to be attached together by the tackiness of the glue. It shouldn’t rub off by touch but should feel kind of like the back of a sticker. It will look dry, which may make you want to try bonding them sooner but don’t! It gets the best bond when it looks dry like that. The instructions on most brands also say that you typically have up to a 2 hour window to bond your pieces together before they are too dry to properly stick together.
When you are ready to attach your pieces together, start at one end and hold the two pieces together firmly for 30-60 seconds. Then work your way from one guide mark to the next, again holding each inch together for a bit to guarantee proper bonding.
Whenever you know that one of your two pieces is longer than the other and needs to squish a little to line up properly, skip from one guidemark to the next and then carefully work the gap together. The marks are there to keep you on track as you go, and they are especially handy in these situations.
If you have a bit of excess glue around the outside of the seam line, don’t panic. You can usually roll them up into little beads by rubbing back and forth along the seam with your thumb.
Moving on to Cyanoacrylate, it is a similarly fast and strong bonding glue. It is also similarly fumy, so again be sure to work in a well ventilated area when using it. Be especially careful of your eyes, they will start watering up when exposed to heavy amounts of super glue fumes. Wearing goggles will protect your eyes from the fumes if you have to have a piece close to your face while glueing it together.
It takes a lot less super glue to do a similar job to Contact Cement, and it typically will bond together within a minute of applying and holding the two surfaces together. This can become instant with the use of an accelerator.
Be aware that super glue LOVES to stick to skin. And I am very guilty of using my thumbs to help hold wet seams together or wipe away excess glue. If you happen to get super glue on your skin, you can use nail polish remover or acetone to get it off.
The key to using Super Glue effectively is to use very little at a time, and slowly work your way down a seam line. With practice, you can get very quick and clean seams!
So is one inherently better than the other? Contact Cement can be messy, but is cheaper, stronger, and more flexible once cured. Cyanoacrylate is fast, less mess, and easier to control as you work. It is less flexible when cured, but this isn’t usually an issue for most props and armor. Personally, I like to save Contact Cement for the bigger projects and use Super glue for the smaller ones. And there is overlap in this of course, often times I will use both within the same project for different parts. Ultimately it comes down to preference, and you don’t have to use either of these glues if you happen to have a preference for a different one.
There is of course the unsung hero of the final hour, hot glue. I think everyone can agree that hot glue still holds up in a pinch, but the main reason I stopped using it as a primary glue is simply because it’s heat activated. Because of this, any environment hot enough can reactivate and soften up the glue in your project. Long road trips in the summer can wreck a prop or armor piece that relies too heavily on Hot Glue. And nothing is less fun than having to re-glue half of your costume together in the hotel room the night before you wear it.
With all of this said, here is a look at our overall costume progress so far! All of the eva foam armor has now been patterned, cut out, and glued together. Next week I will be cleaning up some seams and edges. Hopefully we will also begin sealing and priming all of these pieces in preparation for painting. Thank you all for keeping up with our progress, and happy crafting!
]]>Before starting, make sure that your workspace can contain a mess. The dust created from sanding EVA foam is lightweight so it can easily fly outwards and collect almost anywhere within 5-10 feet of your dremel. A table in a corner or next to an empty wall is ideal, so that it will limit the dust travel. You can also dremel over a trash can, but some dust will still escape onto nearby surfaces. My setup is in the middle of a larger room, so I may end up having to sweep a bit more as a result.
Because of how easily the EVA foam dust travels, you will want to wear safety goggles and a respirator mask. You will absolutely inhale EVA foam dust if your mouth isn’t sufficiently covered. There are a number of horror stories out there for people who have developed breathing problems from sanding without wearing proper safety equipment so PLEASE do yourself a favor and invest in a respirator and goggles if you don’t already own them.
Onto the Dremel itself. A good dremel will likely run you between $50-100 by itself, but for cosplay it is absolutely worth the investment to also buy a flex shaft. The Dremel on its own is bulky, and will wear out your arm very quickly. The flex shaft is an extension for your dremel which gives you a much smaller end piece for your dremel bits to connect to. Since the dremel will vibrate a lot while in use, the best way to use a flex shaft is to hang your dremel off of a stand. Dremel sells its own stands like the one pictured for a reasonable price, but you can probably make your own for cheaper as well.
Here are a couple of standard sanding head options for a dremel. The bigger sander heads have replaceable sandpaper cylinders and are good for sanding the bulk away. The smaller stone grinder points are meant for harder surfaces like metal, but the finer grit and small size makes them good for details. You can buy them in a few different sizes at most hardware stores as well as online.
Once we have our setup ready, let's take a quick look at our armor pieces. I added guidelines to my laser cuts so that I will have an easy reference to where my bevel ends. If you are drawing your patterns onto foam by hand, you can make copies of the pattern pieces used for tracing, draw your bevel lines onto the copies, and then trim away the edge so that you can easily replicate your bevel onto the foam without error. This is especially useful when you have multiples of the same piece. I always recommend making copies of your patterns for these kinds of alterations so that you have an original pattern to fall back to if you need to backtrack or start over.
The first rule of dremelling is to go slow. Always make short, shallow passes away from you. This isn’t as much for safety, but for control. You’ll notice that right as you first put dremel to foam, the spinning of the head will naturally push the dremel outwards away from you. If you try to dremel towards yourself you are fighting that spinning direction, which may cause you to sand off too much. If you need to sand different angles, rotate the piece you are holding so you can maintain your outward sanding motion.
Here’s a look at one of the backplates. Rather than trying right away to dremel the angles into the bottom, I first dull away the edges, slowly taking more and more away until I have more room to carefully use the edge of my dremel for angles.
If you accidentally dremel farther than your guideline or nick your outermost edge, don’t panic. You can usually sand up to a few extra millimeters into your edges without impacting the overall shape or fit of your pattern pieces. Notice that I am demonstrating this on a scrap rather than my actual armor pieces. I’ve said it before and I’ll say it again, practicing on a scrap is a very good way to build confidence through experience. You can intentionally make mistakes like this and then learn how to fix them without the pressure of failure.
If you are wanting to create weathering or battle damage effects on your armor, you can make imperfections look intentional by exaggerating them into a scar or dent. I recommend saving this decision until after you have finished your initial bevelling. I can’t tell you how many times I have tried to fix an imperfection by sanding the whole edge down to match, and then slipped and put another nick in afterward. It’s easier to decide how you want to proceed in stages as you sand, so that you can either fix multiple imperfections at the same time, or turn them into battle damage at the end.
If you are dremelling edges that you will glue together afterwards, be sure to consistently pause and hold the two pieces together to make sure they still line up nicely. You would be surprised at how quickly and easily one piece will differ from the other while sanding, so the more frequently you check them to each other, the more accurate your finished seam line will be when they are attached.
In a similar vein, keep all of your pieces that overlap in layers close and observe how each bevel looks compared with the others. Individually the bevels may look the same, but when you go to attach your layers you might suddenly discover that one bevel is different than the others and have to go back to fix it. The guidelines will help you a lot with this, but the act of consistently comparing the current piece you’re working on to your others will help you to see the bigger picture and minimize your mistakes. I think I can speak for us all by saying that some of the most mentally draining mistakes made in crafting come from working on pieces separately and then only noticing their incompatibility with each other when you go to assemble your armor at the finish line.
And here’s a look at all of the beveled pieces at the end of my week. Thank you for reading this week’s progress blog! Next week we will begin assembling the armor pieces.
]]>In the first progress blog, we talked about setting up your canvas to match your printer or cutter. Now is the time to make sure that your canvas size is set so that you can print your patterns. We have our canvas set to 32”x20” for our laser cutter. If you are simply printing paper patterns and hand tracing them onto your final armor material, then you’ll want to set your canvas to the standard printer paper dimensions of 8.5”x11". Cricut cutters and other similar machines will have varying canvas size options, so be sure to check what yours is and apply it here.
Arrange all of your pattern pieces onto your canvas and allow about a half inch or so between each shape and the edges of your print space. Since I have a lot of different pattern shapes to keep track of, I group together all of the shapes that will fit together on a single canvas. I ended up having 3 sheets worth of patterns.
For those of you using a regular paper printer, you will likely have to divide some of your patterns between multiple pages. To help you line things up properly, I recommend creating guidelines on your patterns close to the runoff point of each page, so you will be able to visibly see where a shape will connect to itself after they print. You can do this with a line tool, and put it in the same group as your patterns so that it will stay lined up when you reposition the patterns to print the other half. Some editing programs may automatically print your larger files without the need to manually subdivide them as shown here. You’ll want to experiment to see what works best for you.
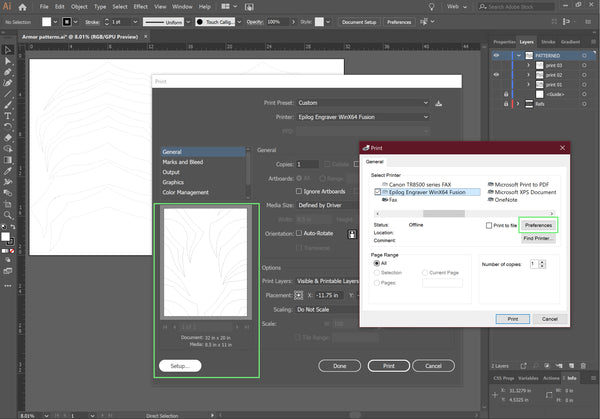
If you have access to a laser cutter, they will typically have specialized software. We have an Epilog brand laser cutter, and the laser settings can be adjusted within the normal printer preferences. So we’ll go to the main menu and select Print (or press Ctrl+P). Once the printer options window opens, we see that the printer wants to default the canvas size to 8.5”x11”. We will fix this and adjust our laser power at the same time by selecting the Setup button on the bottom left. This opens a second window, which allows us to select our Epilog laser among the list of available printers. But to adjust our laser settings, we need to hit the preferences button in this second window, which will open up a THIRD window.
This third window is blue, and contains all of the Epilog specific settings. Our laser printer can cut with Vectors, or engrave Rasters based on color values. Since we only want to cut, we select Vector in the Job Type options. Directly below it are the dimensions for our canvas. This is where we will change the Horizontal to 32” and the Vertical to 20”. Finally, to the right of this are the Vector settings. These three bars determine the speed, power, and frequency of the laser beam. All of them default to 50 on a power preset, but since I am cutting through high density 10mm EVA foam I want to slow the cut a little, increase the power to full, and up the frequency just a little so that the laser is hitting the foam more. After this I hit Ok in the third window, Print in the second window, and Done in the first window to save all of these settings. For some reason my computer won’t save the settings if I hit Print on that first window. So I hit Done instead, then I bring the Print window back up a second time and hit print.
If you are new to working with a laser cutter yourself, you will want to have help from someone with experience the first few times. Laser cutters use a concentrated beam of pure energy to melt/burn through the material, so there will always be an inherent fire hazard associated with them. I speak from experience when I say that things can catch on fire or start melting, so I cannot stress enough that you practice safety! It may not happen every single time, but make sure that you have a fire extinguisher ready in the worst case scenario, and always start with lighter laser settings and slowly work your way up on the power to see what cuts your material the best without melting it or catching it on fire.
If you are using Cricut, it has an online program that takes you step by step through the printing process. You can create an account and save projects within this web based program, it is quite easy! Additionally there are plenty of online tutorials to help you dive deeper into Cricut for patterning or any other crafting project.
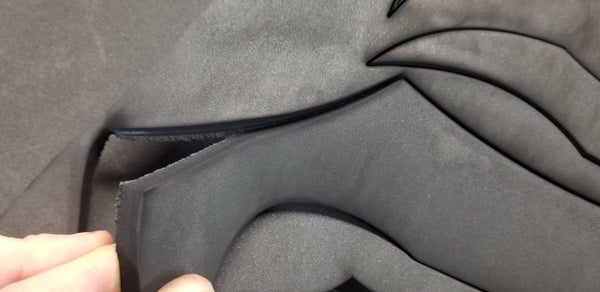
So back to this project, I now have my pattern pieces laser cut into the EVA foam. With thinner foam sheets a couple of passes with the laser will likely cut all the way through, but this thicker foam is stubborn. Some pieces were cut close enough to be able to pop out easily, but others start to tear a little if I’m not careful. For the pieces that can be popped out, I push down on the piece itself and pull up on the material around it. This minimizes the chance of tearing because I’m stressing the foam towards the already cut side rather than trying to pull towards the side that isn’t cut. Since I’m going to be dremelling all of these edges I don’t necessarily have to have the cleanest cut anyway, but clean cuts will save you a lot of extra effort if you don’t need to sand the edges of your pieces.
For the pieces that still don’t want to pop loose, I use a combination of scissors ,extendable hobby knives, and X-acto blades to cut the rest of the way through. Scissors are quick and easy to use on broad cuts, and it will often times leave a slightly rounded edge which can look pretty nice and finished. However, scissors also tend to leave little burs and imperfections, so you either need a steady hand and sharp scissors, or be willing to do some light sanding afterwards. With a bit of practice, you can get pretty good at figuring out which pieces need the cleanest edges, and which ones you can get away with using the scissors on, but it is ultimately up to your own preference.
For more precision and cleaner cuts, razor blades are the way to go. You can still do pretty broad cuts easily with an extendable cutter, and finer cuts with an X-acto knife. The trade off is cost. You’ll have to make the investment in a cutting board, and the blades dull much quicker than scissors because they are not only cutting through your material, but also into the cutting board underneath. You can extend the life of your blades by purchasing a sharpening kit, and you can also typically buy blades in larger quantities online than in stores. Be sure to practice safety when using these blades, and also when disposing of them!
As you are cutting out your shapes, be conscious of the angle of your cuts. It is extremely easy to accidentally cut your edge at an angle when you wanted to cut it straight. Similarly, you may find that an edge you cut straight actually needs a bevel in order to attach to another piece. I recommend practicing both types of cuts on scraps, it can take the pressure off of you while you learn technique before going hard into a project and messing up your edges. But also don’t be afraid if you do cut an edge wrong, you can typically dremel sand that edge to fix it without having to recut the piece entirely.
Once all of your pieces are cut out you’ll have plenty of scraps leftover. I personally like to save them for a while before tossing them, just in case I need to recut something, add smaller details, or add structure to the insides of the armor. You can also use scraps to test out a process that you aren’t confident with, such as different types of sealing and painting, sanding, cutting, gluing, etc. I will typically separate out my bigger scraps from my smaller ones, and if I have a lot of different thicknesses of foam I may also separate them out by thickness as well.
Thank you all for reading this week’s progress, and we hope you’ll check back next week to see how we do some basic dremel sanding. Happy New Year!
]]>The hip and leg armor pieces wrap halfway around each leg. Since you can’t see the whole shape without multiple reference pictures, we’re going to pattern the different parts separately and then combine them together. We’ll start with the front and back reference images. I’m not too worried about the cutoff points for each shape since they will need to be adjusted when I combine them. I am also going to ignore the bevel in these armor elements for now. After I have finalized the fit of these flat patterns, I can decide if I want to further break the patterns down to accomodate a bevel or simply dremel sand a bevel into layered foam.
Next we can move them over to the side view image, and this is where things can get tricky. I notice that even though my t-pose references all look the same size, the front and back pieces I vectored aren’t quite lining up with my side reference image. I’ll use a bit of guesswork to line them up for now, knowing that I can always make adjustments later.
Here’s a trick you can use to get all of these points to line up nicely. First select all of the cutoff points for the shapes. Then go to the Object menu > Path > Average (or hit Alt+Ctrl+J). In the pop up window select Vertical and hit Ok. You’ll see that all of the end points are now centered together, but we still need to line up the end points horizontally and connect the front and back shapes.
To do this, select two end points and use the Average feature again, but this time hit the “both” option so that they are centered at the same spot vertically and horizontally.
You might be asking “But Kyle, why didn’t you just use the both option for all of them together?” Well...if you do that then every single point will center horizontally and vertically, which gives you a spider web. And if you skip the first step and only align the pairs of end points, then you may find that they no longer line up with each other vertically because their averages are different from each other. I love math...math is fun...
So we have our side points lined up now, but the shapes could still use a bit of tweaking. I use my own artistic senses to average up the heights and clean up the curves. I anticipate that these patterns will probably need adjustments after a test print has been tried on, but it’s a good starting point. To create the upper hip plates I repeat my process from the leg pieces. I add some overlap between the two layers so that they can be glued together easily.
Now that all of my pieces are patterned out, I need to scale them up to the right size. An easy way to do this without having to worry about measurements is to select all of my shapes and the reference picture and group them together. This will make it easy to select them all together without worrying about missing any of them. Next, I make the Torso armor pattern visible and carefully scale up the group until the reference picture loosely lines up with the torso piece. This should theoretically make all of my pieces the correct scale, but as mentioned before they may all need adjustments so we’ll be sure to print out a test pattern on paper to fit onto Harl before considering these patterns final.
As we wrap up 2019 and jump into 2020 I’m sure a lot of you have some big projects in mind, and they may seem pretty scary or even impossible. Believe me, I still get intimidated by projects after making costumes for half of my life now. The biggest piece of advice that I can give to any of you who are struggling is to have patience and give yourself the time to learn. Absolutely nothing in life is easy on the first try. Reading, writing, math, sports, driving, and creative endeavors are all learned over time as we grow up, they don’t come naturally. You may feel lost or want to give up at first but whenever you hit a snag take a short break to clear your mind and then try to hone in on what seems wrong before starting over or giving up. Ask for help from a friend, post your question in an online cosplay community, or even shoot a message to a cosplayer you admire. I have been patterning digitally for 5 years and on drafting paper with pencil for over 10 years. I have been making costumes for half of my life, and I have been an artist since before elementary school. I still have to make adjustments to every pattern I draft up, they are never perfect on the first try. I still find myself making really dumb mistakes on every costume and wanting to tear my hair out. But with each pattern I create, and each costume I endeavor to finish, I improve a little more. So don’t ever give up, you can create anything you set your heart to as long as you give yourself the time!
Happy Holidays everyone! Tune in Next week as we move on to eva foam armor construction.
]]>First, I have to gather together my reference images and place them into my file for quick and easy viewing. Luckily, I have an image of the armor in T-pose from every major angle, as well as plenty of high quality images to compare details at different angles. The more angles and variety of poses you can get reference pictures of, the easier it will be to figure out your pattern shapes. I always like to have the concept art for reference as well, because there will typically be some differences between concept and final, and I may decide that I like the proportions or details of the concept art more than the final renders.
If you’ve never made a vector shape before then now is the perfect time to learn! I’ll start with the belt buckle and back armor plates since they have simple and flat shapes. I leave the reference images relatively small since they have a low resolution, but there really isn’t a right or wrong size to initially vector your shapes at. Once a pattern piece is vectored, I can easily scale them to the correct size using the rulers and guidelines in the program.
The Pen tool can be found in the tool panel on the left, or you can type the P key on your keyboard as a shortcut. Make sure your reference images are locked (the lock column is in the layers panel next to the view column) and click on the image wherever you want to start your shape at. The Pen tool will place a dot there, called an anchor point. Now if you simply click another spot nearby the Pen tool will automatically create a line connecting the two points together. However, since we want curves in our shape, hold your mouse button as you click your point, and drag at a nearby spot along the edge of your shape. As you drag your cursor the Pen tool will create handlebars which determine the curve of the line. These handlebars are the foundation for vectoring anything outside of a box!
You’ll notice that if you try to click your next anchor point from here it will just continue the curve of the previous point over to your current. Sometimes this is good for large or complex curves that require more than one anchor point. But we want a sharp angle, so there are two ways to do this. The first option is to hit Ctrl+Z to undo your point, and then hold the Alt key as you click your previous anchor point to remove the second handle bar of the curve. This will allow the next point to create a new curve so that we can have the sharp corners in this shape.
The second way to alter curves is to place your anchor points first, and then hit Shift+C to go into the Anchor Point tool (you can also find this tool by clicking and holding over the Pen Tool icon until it pops up your other options). You can use the Anchor Point tool to adjust the handlebars of your curve independently of each other, which will create a corner at your anchor point.
Both of these options are important, because sometimes you will want only one handlebar at an anchor point and other times you will want both. You can also use the Anchor Point tool to create a curve on an anchor point that doesn’t have one by clicking the point and dragging your cursor. After finishing half of the belt buckle, I went back and tweaked my curves a little more.
To create the bevel guideline, I copied my half shape and pasted it in place, and then adjusted each point and curve individually. If you try to simply scale the copy down all at once the corners and curves may not match up very nicely (though you can always try it first to potentially save time). Finally, I copied and mirrored my half shapes and then joined the points together just like we did last week.
For the Back Plates I used the same process as the Buckle, except I made one entire half piece and then mirrored a copy of it to create the other. One additional change to make is to the tops. They will need to wrap over the shoulders, so I will lengthen them just a little bit. If it’s too short or too long in the test fit I can quickly tweak that before cutting out the final.
And wow! Going through the basics got a little deeper than I originally expected, so we’ll wrap up this week’s blog. For any of you wanting to continue learning how to vector pattern, next week we will teach you how to use multiple reference images at different angles to make a pattern pieces like the Leg or Hip armor, which wrap around the body instead of just lying flat.
]]>The programs used to create the base patterns are able to generate a flat image based on the 3D game model. However, due to slight differences in size between the 3D models and Harl, I needed to make a few adjustments. Vector programs such as Adobe Illustrator or Inkscape are essential for patterning shapes if you want to easily make adjustments to your pattern or mass produce it. If you haven’t ever used a vector program before they are easier than you might think! You can search the web for tutorial videos and articles on how to create vectors with the program you have (Adobe and Inkscape both have large communities with plenty of useful info). I will also cover a few of the basics.
To start, we want to make sure that our canvas board is set to the dimensions of your printing tool. When you start a new file, the canvas size can be set in the first window. The default is usually a portrait orientation and standard 8.5” x 11” canvas size. We are using a laser cutter with a landscape orientation and 32” x 20” canvas size. If you need to change your canvas size after starting a new file, you can go into your document settings and edit the canvas size from there.
Next we’ll place the generated pattern shapes that we want to alter into our file. Go to File, and Place, and then navigate to the files you want to place. You can use this feature to import almost any kind of graphic file, including jpeg images for reference. Once you have selected the files for placing, your cursor will change to indicate it is ready to actually be placed onto the canvas. You can either click a spot to import the image in its original size (image 02) or you can hold down the left click button and drag to create a custom size of the image. The nice thing about placing these files is that they are linked to the original so you can still change their size at any time without affecting the quality of the image.
Some of the shapes are already optimal to print, so we will hide them for now. We will also hide or lock the objects that we do not want to edit yet just to make sure we don’t accidentally select or alter them. Starting with the main torso, we use the direct select tool to highlight half of the object and delete it. The reason for doing this is that we can edit one half easily than both, and then create a mirrored copy and attach the two halves back together to make a perfectly symmetrical shape.
If you look at the objects and layers window, you’ll notice that this pattern shape is actually a large group of individual lines that are placed together to form the pattern. We want to simplify this for easier alterations, so we are going to combine the end points of each line to create closed shapes. To do this, we carefully highlight a corner, which selects both end points of the two lines that are meeting. We then press ctrl+j to join the two together. Once we have joined all of the lines together we now have shapes that are a lot easier to register in our list of items on the right. If you want, you can further organize layers, groups, and individual objects by double clicking them in the list and giving them names.
After we have made any adjustments to the pattern shape, we select the entire group of objects and hit ctrl+c to copy, and then ctrl+shift+v to paste the copy in the same place as the original. If you only hit ctrl+v it will move the copy away from the original. We don’t want this because we intend to keep the two halves lined up. With the copied half selected we go to the Object menu, Transform, and Reflect. We’re reflecting ours vertically. Now we can either drag the mirrored copy while holding the shift button to keep it lined up, or we can simply hit shift+right arrow key a million times to move it into place. Finally, we combine the two halves using our ctrl+j join feature.
Once we have repeated this process for all of our other shapes, we eventually have everything ready to print. This is the part where you’ll want to rearrange your pattern pieces to fit onto your printing material. If you are printing on standard 8.5’’ x 11’’ paper, you may want to create reference lines for each sheet you are printing so that you can more easily tape together any pattern piece that is too large to fit on a single sheet. Since we are using a laser printer to cut out the final pieces into eva foam, we are arranging our patterns so that all pieces fit in the laser cutter’s printing area.
After we have printed out a test of the pattern on heavy paper, I tape it together to have Harl try on. Even though I have years of patterning experience there will still be some things I don’t quite get right on the first try. I make notes on my pattern so that I can go back and make additional changes to the pattern file later. Luckily the imperfections here don’t affect the overall size of this pattern so this mockup will serve the intended purpose for a test fitting.
Test fitting your pattern with a mockup is a safety measure to keep you from potentially wasting your final material if any shapes need heavy changes. Luckily for us, these pattern shapes will be good to cut into the final material after I have made minor adjustments to the sides. But before we jump into armor construction I still have one more week of patterning left. Tune in next week as I cover how to make a digital pattern from scratch using reference images as a guide.
]]>I’m Kyle and this year I will be working on parts of Harl’s Ventus armor from Kingdom Hearts Birth by Sleep. This costume was already in progress last year, so I will be taking some of the assets provided to make foam armor pieces for the torso and legs. After the foam armor has been crafted I will help to make sure all of the armor pieces are properly rigged together and fit comfortably with the bodysuit. In between, we will show progress on the suit itself and the finishing and painting of some of the 3D printed armor pieces previously provided to us. Once the Ventus armor is complete, I will begin working on Terra armor as well. The Terra armor may not reach completion, but we will do our best!
Each week I will show off a bit of my process along with some small tips and tricks for EVA foam armor making. Tune in to see Lumin's products in action, and work along with us to earn prizes and finish those costumes by Katsucon!
Source:
Kingdom Hearts: Birth By Sleep
Hi again and welcome back! We’re in the final stretch!
This is my last work log for WWWIP 2019. Next week I’ll have everything completed and gathered together for my photoshoot.
The last prop I had to focus on creating was the quiver and arrows. Runaan’s quiver appears to have a uniquely patterned large leaf wrapped around it. I created the base cone and the outer leaf of the quiver with 2mm Hard-Lite Foam. There’s also some 10mm Half Dowel trim on the inner base cone ridge. The arrows are made from 10mm Foam Dowels with Form-Lite foam details. They’re not hard, and are very flexible but they’re also very convention safe and light to carry around.
One last detail I had to finish up was the “binding” ribbon around Runaan’s arms. I tested two types of decorative elastics that I purchased and dyed grey with Rit Dyemore Synthetic in Graphite. I only placed the elastics in the dye pot for about 15-20 seconds each to achieve a light grey. In the end, I chose the more subtle/less decorative one!
The photo on the right shows a similar elastic to the one I used in the same beige colour that it originally started out as.
Thanks for joining me! I’ll see you for my quick blog next week before I head out in the Canadian cold for my photoshoot!
- Mahou ☆
]]>Hi Everyone!
This week I created the wig and did a whole fitting test! In the past I've found myself trying on the entire costume for the first time the day of the convention, and that always created small issues here and there during the day. Now that I have learned better, I try and push myself to be able to do an ENTIRE costume fitting at LEAST a week before the convention. So, this week I pushed myself to finish all the items to a point where they can all be worn. The first thing I started with was the wig!
The wig I wanted to use for this cosplay was the Lindsay. This is one of my FAVORITE wigs from Arda and eventually I want one in every color! I chose silver because I think white would blend with the costume too much, and blue would be too strong. So silver is the next best choice, and will go with the metal pieces on the costume! Now, as a precursor for this part of the blog - I do not know much about wigs, and have never done a wig project this large before. So, come with me, a wee little beginner, and let’s conquer this wig!
Before starting this project, I have been watching a BUNCH of wig tutorials and videos on YouTube to get as much information as I could before approaching this project. Here are some of the first steps I did:
I am a wig noob, so I never knew why people thinned out hair, but I understand now! For longer hair, thinning out the ends of the hair helps it not become so tangled and also helps with the weight of the hair. I do not have any thinning shears, so I used scissors and a razor to thin out my wig. I just ran the razor/scissors down a section of hair and lightly cut small bits as I went down the section. Super easy, fun, relaxing, and satisfying to do. I cut off a good amount of hair, and when it was finished, I was able to throw the wig around more aggressively and not have to worry about it tangling. Now, that might not be a huge issue for some people, but as a drag queen, we are ALWAYS throwing our hair around!
Here are some photos of what the wig looked like after the thinning. It’s so much easier to manage, and looks more realistic too!
The next thing to do is add the horns and here is how I made them:
I first started by gluing pink foam together and carving out the horn shapes I wanted. The smaller horns are 2x2 wide and the larger horns are 3x3 wide.
Then I covered them in Thibra and added foam details to them. Now the most IMPORTANT thing I did was add the little dog key chain pieces to the bottom of each horn. These are the same key chain pieces I have been using throughout the entire project. Now, this may seem odd, but these will give me an anchor point to hand-stitch the horns into the wig! Before adding the horns, I primed and painted them.
Before attaching, I started playing around with the right spacing and placement of each piece. Here you can see me trying to find the right placement for the crown and horns. Once you find the right spot, you can start sewing everything in! I kept the hair parted on top, because it made it easier to get to the tracks when stitching.
Here, on the left, I am holding the horn into place before I start stitching. On the right, you can see what it looks like after I have stitched the horn in. Make sure you get these stitches really tight! The tighter the stitchings, the less the horns will wiggle and the less you will be able to see the attachment from far away. I put 4 small key chains on the bottoms of each horn, so that they were extra secure when sewn down. If you are doing this too, I would use no less than 3, or else the horns will wobble a lot!
Here is what the left side looked like after I finished! I was super pleased and just needed to match the right side!
Once I finished attaching the horns, I added some of the small key chains to the crown, and sewed that in as well! The crown is super helpful because it acts like a counterweight to the horns and really balances the wig.
To finish the wig off, I did some last bits of styling. I slicked back the top section of hair that was in the ponytail, and added some side braids with some of the metal chain maille. I felt like these additions would help it read more “warrior” like and complement the crown as well.
Here are some photos of the finished wig! I am super happy with the results and the fact that it’s so light! I can move around and dance in this wig without the worry of it falling off! I know it might be a simple style of wig, but I think it’s a pretty good beginners step for me, and I am proud of myself for that!
Anyway, onto the full costume wear test!
The wear test went GREAT! Everything fit properly, some things needs some extra reinforcement, but I am really pleased so far!
The biggest thing I am working on right now is the placement of the belt/skirt. In Zach’s original design, he has the belt/skirt on the hips; however, with the changes I have made to the design, I am not sure if I like it there anymore. In the photo on the left, I have placed the skirt/belt higher up and I think it works better. I find that it creates less lines on the body and lets the eyes focus more on the details of the armor. Whereas, the photo on the right, has some really interesting and fun lines around the hips, but it distracts too much from the rest of the armor.
What do you all think?
]]>We are starting to wrap up our weekly winter series for this year, and I am getting closer to my goal. I have been bouncing around a lot over the past few weeks but I finally have some of the jackets finished enough to show you some progress pictures!
Cadet jacket #1 just needs the trim, pocket flaps, and cuffs.
Cadet jackets #2 and #3 are 2/3rds done.
Villain #2 needs sleeves, cuffs, collar, and trim.
Villain #1 needs collar, cuffs, and trim.
I would also like to share a trick I use to shorten the length of zippers in outfits. This trick can come in handy if you happen to have extra zippers lying around or can't find one in quite the right length.
First, figure out the measurement you need based on your project and mark it on each side with a pin. Add about two inches to that length and cut the zipper.
Disclaimer: I used an older pair of fabric scissors and carefully cut between the teeth to avoid nicks on the blades. Be sure you’re not using your nicer fabric scissors for this step!
This next step is optional, but will add a bit of finesse. If you have a pair of needle nose pliers you can carefully loosen the stopper on the original ends using the wire clipper as a wedge. Remove the teeth past your new end point and clamp the stoppers into place.
Fold the excess length at a 90 degree angle and pin in place. Pin your zipper to the garment according to your pattern directions and sew into place.
Hi again and welcome back!
This week I made a shoulder pauldron and the small hair pieces! I’m also going to share my favourite tip for transporting styled wigs.
Again, I used EVA foam sheets from Arda Wigs Canada (Read more about the new types of EVA foam sheets here!). I also used 10mm Half Dowels from Arda Canada for detail work on the hair accessories.
My favourite way to make hair accessories for wigs is to line them or back them with the “hook-side” of Velcro so that they don’t slip down or off at any point. Keep in mind that the plastic backing of Velcro doesn’t glue well to EVA foam, so I first sew it to felt before gluing it to the foam.
The pauldron is super simple and made using both 6mm Form-Lite and 2mm Hard-Lite foam. I carved the details in with an X-Acto knife and heated them up with my heat gun so the detail would become more prominent.
Now these just need to be sealed, primed, and painted, and I’ll be close to done with the accessories! Keep in mind that I like to paint all accessories at the same time to avoid differences in my paint mixes!
Lastly for this week, here’s a quick tip for transporting wigs! I purchased a few cylindrical yarn/knitting bags with a hard/plastic base and sides. I slip my wig (on a head) down into these types of bags, and they protect it while also giving me a great handle!
Thanks for joining me! We’re so close to the end now! Wish me luck!
- Mahou ☆
]]>Hi Everyone!
This week I have been working on the attachments for all of the armor. Some attachments are pretty simple, where others are more complicated and need a couple different attempts to make them perfect. Remember not to get discouraged if something doesn’t work the first time!
The first attachments I worked on were for the arm bracers and the shin guards. They are really straightforward, so I figured I would knock them out first. I attached four D-rings on the underside of each bracer, and six D-rings of the underside of each shin guard. These will provide areas where elastic straps can be sewn on.
Before attaching any elastic, I made sure to burn the edges so they melt and do not unravel. Once I did that, I was able to hand-sew each piece of elastic onto the D-rings. I could not use the sewing machine for this because the armor was too large to maneuver around the machine.
The next step is to attach Velcro. I attached 2-inch strips to both the top and bottom parts of the elastic so that when I fold the elastic over, the Velcro will secure the armor shut. I did this to each pair of D-rings. I recommended using “sew-in” Velcro because it is stronger and more reliable. The adhesive Velcro is not strong enough and can destroy your needle if you try and sew through it.
Now the pieces of armor fit snugly! Later, I plan on adding ½” upholstery foam on the undersides of the armor pieces. This will not only create a nice pad for comfort, but also provide friction so the armor does not move around so much while wearing it.
The next attachments were the most difficult--the chest and shoulder pads. My idea for this part was to have the shoulder pads loop into the straps of the breastplate so everything is super simple and snug. At least, I thought it would work that way. In the photos, you can see the small loops I made for the shoulder pads and how the breastplate straps fit right into them. Once again, I hand-sewed these all in because they wouldn’t fit near the sewing machine.
Here is how it all held up! It’s definitely functional, but up close it is certainly NOT pretty! However, I did learn some things from this! I learned that crossing the straps in the back and having them CONNECT is incredibly helpful for the security of the shoulderpads. The back is perfectly strong and safe, but the front is the part that needs fixing. (P.S. Can we take a second to appreciate how AMAZING the dangly chains look? I think they are so much fun and add an extra dimension to everything. How exciting is that?
Here is the issue I ran into with this part of the attachments. In this first photo here, you can see how the elastic strap is exposed far too much. In the second photo, I have placed the shoulder pad where I wish it would stay. So, I need to create something on the underside of the armor to guide that strap through the armor. One way to fix this is to simply recede the front D-ring further under the armor, guiding the strap underneath the shoulder. Hopefully that will fix it!
I figured for this week it was important to share difficulties I was having with the costume. I have made many sets of armor, but attachments always seem to be difficult in every costume. Just because something doesn’t work the first time doesn’t mean you should stop trying different ideas and methods! Katsu-crunch is starting to hit hard for so many people, so I wanted to make sure I ended this blog with a constructive note to show people to keep pushing through! You all can finish your costumes in time! I believe in you!
]]>
Patterning:
Grab your bowl and cover the inside with either Glad Press'n Seal or a plastic wrap reinforced with tape.
Take your shape out and place it on your shoulder to make sure it will fit properly, and draw a loose outline of your pauldron with a permanent marker. Cut away the excess.
Snip even darts around your shape cover so that it can lay flat. Trace your shape onto paper, filling in sections where the darts don't cover, and leaving dotted lines inside for reference as a back-up plan. These darts can still be cut out if your foam doesn't want to create the right dome shape from the heating process.
Clean up your drawing by dividing it into quarters. Clean up either one-half or one-fourth of your pattern based on the symmetry of your pauldron.
Cut out the part that you have cleaned up, and then fold the pattern on the dividing lines. Trace your cut-out part onto the other side and then cut it out.
Forming:
Trace your pattern onto your EVA foam and cut out the shape.
While in a well-ventilated room, carefully heat up the foam on both sides with a heat gun until the surface smooths out and slightly changes shade or glistens. Too much heat can start to burn the surface of the foam, so you may want to practice heating scraps to find the right amount of heat for your foam.
Once your foam is heated up on both sides, press your pauldron into the bowl, and pinch the edges until they contract enough to form to the shape of the bowl.
You can optionally take a can of condensed air, invert it, and use the cold blast from it to quick-cool parts of your foam as you go so that you don't have to worry about shaping the whole thing at once.
If your foam is being stubborn and won't hold the shape you need, don't lose hope. You can still cut out the darts from your initial pattern and glue them together to help create your dome shape.
Congratulations! You should now have a finished pauldron shape that you can add details to or seal and paint. You can check out my post from the previous week for a quick guide on stretching fabric over your shape as an alternative finish to paint.
Thank you all for reading; I hope it will aid you in all of your shoulder armor endeavors!
Hi again and welcome back!
This week I attached my boot covers to a pair of inexpensive flats and I worked on some accessories!
Boots!
(Please keep in mind that I fill these out much better than my mannequin does!)
Accessories!
Arda Wigs Canada just announced that they now officially carry EVA foam sheets in two styles (Form-Lite and Hard-Lite) in eight thicknesses from 1mm to 10mm! I was overjoyed and immediately knew this would be perfect for all the armour/accessories for Runaan! Read more about the new types of EVA foam sheets here!
I used 6mm Form-Lite foam for the bracers and 10mm Form-Lite foam for the belt buckle. I also used some 2mm Form-Lite for the pendant details as well as a 10mm foam dowel. One key piece of the pendant is the gem, which I decided to make with Worbla Deco Art mixed with nail polish.
Below are some progress photos! I’m happy with all of these pieces so far!
(Worbla Deco Art gem)
(Pendant WIP)
(Bracers WIP)
(Belt Buckle WIP)
Thanks for joining me on my journey so far! And I’ll see you next week for more foam accessories!
- Mahou ☆
Hi Everyone!
This week I worked on getting as much I could painted. Painting is one of the most transformative aspects of the entire costume--it really helps you envision the entire costume as a whole. With that being said, it takes quite a while to hand-paint all of the details on the armor pieces. And it’s too cold where I live to spray paint anything, so I even had to hand paint three layers of white primer. Anyway, let me show you how I paint my armor!
Once the primer is on, I paint a background color for the parts of the armor I want to be shaded. In this case, I am using a blue to try and match the blue stripes on the sewn portion of the costume.
Then, with a small-medium brush, I start to dry-brush white all over these areas. I try to fade the white out once I get near any type of detailing or edging. This creates a gradient and puts dimension into your armor. I let this dry and will go over it again 1-2 more times to make sure everything is blended and smooth.
Some people use this type of painting style to show weathering on their armor pieces - especially when painting golds and silvers. However, I don’t believe that Light Fury has much weathering and/or age on her character, so I just use this technique to create dimension to the armor so it is not so flat.
Here, I repeated my previous step of shading 2 more times in order to get into all the crevices and make sure it was a nice gradient. Make sure you use a small, dense brush for the tight areas. This will really help with control and a smoother outcome.
This next step is pretty easy - I just painted the rest of the edging/details with either silver or white. Make sure you use a steady hand to get those crisp, sharp edges!
After the entire piece is painted, I typically will spray 2 layers of clear coat to protect the paint. Then once they are dry, I use a small white paint pen and add little details here and there. Unfortunately, I can’t spray the clear coat yet due to the weather, but as soon as a warmer day hits, I will be spraying ALL of my armor! Luckily, the clear coat is just about the final step for the armor and could be done a couple days before the convention, so i'm telling myself I have time…..
Something extra I have been adding are these small little chains with scale maille on them. In one of my previous blogs, I talked about how I was using small dog collar key chains to connect parts of my costume together. Well, I found another use for them! I’m able to hang small little scale maille chains on different parts of my armor. I really wanted to add these because it brings in that “dragon” aspect to the armor and will hopefully help it translate more “dragon”-like in the final design.
Here is what this week’s painting progress looks like!
Also, this week, the rest of the materials to complete the armor come in, so I will be able to finish the missing hip and shin armor and get those painted as well.
I hope everyone else’s costume progress is going well! I’m curious, does anyone else take a really long time to paint? I feel like I paint too slow sometimes!
This last week went by in a flash! I am continuing to sew together all of the jackets, but to keep things fresh for my blog I thought it would be fun to show you all how to make a decorative "metal" piece for a costume by gluing stretched metallic vinyl over a foam shape.
Pattern out your shapes:
I am making the two different belt buckles in the example. Since they have crevices in some of the details I am going to cut out a layer for the base and a second layer on top for the raised details. When your object is flat like these belt buckles, it's easy to draw the finished design first and then draw a copy of it for the base, while cutting apart the original for the details that will go on top
Trace and cut out your pieces:
In my case I am using a 4mm EVA foam. I like to keep an eye out for parts of my patterns that can line up with each other and draw them without gaps. This not only minimizes the foam scraps you can't use afterwards, but it also means less cutting in general (which saves time in the long run). EVA foam is cheap and easy to work with, and can be cut with scissors or X-acto blades.
To get my top pieces, I first cut out a copy of the base layer, and then traced the details and cut them apart. This gives a higher likelihood of the pieces lining up with my base piece rather than cutting each detail out separately. I also traced the same details onto the original base so that I will have guidelines to place my pieces on when gluing them together.
No matter how carefully you draw and cut your pieces, the edges may still not line up perfectly. Glue them together first and then go back with a dremel to smooth the edges out.
Now cut out your vinyl pieces to stretch over the foam. You will want to give these shapes an extra half-inch from your pattern piece so that they can wrap around the edges of your foam.
Apply the glue to your foam:
I am using an adhesive spray, which is VERY sticky, so I lay down some paper to protect the surrounding space from the glue as I spray it to my pieces. Read the directions on your glue of choice to make sure you apply it correctly. Some glues require time to sit in open air between initial application and bonding. Some glues also have fumes and may require a well-ventilated room and/or a fume mask.
Start applying your vinyl to your piece at the very center, and slowly work your way out to the edges, smoothing the vinyl outward as you go. If the material stretches more to one side than the other, that is okay, as long as you have enough coverage for all edges. For crevices, use a butter knife or clay tool to push your vinyl into the crevice. You may need to hold them in place while they dry, so you can also use multiple small things to push into place and leave until they have finished drying. As you get to the edges, you may need to pause to allow the top to dry and flip it to apply glue to your edges and bottom. Once you have glue on the bottom, carefully stretch your vinyl around the edges and press into place. For corners, allow the extra fabric to create a single fold that you can either snip off or glue down afterwards.
If you want to add extra dimension or weathering, you can, but be sure to test your paints on scraps of your vinyl beforehand to make sure they will stick and dry properly. If you choose to apply paint to your item, be sure to apply a finishing clear coat to keep the paint from rubbing or flaking off.
]]>Hi again and welcome back!
This week my main focus was on making a stencil for Runaan’s arm tattoos, but I also did a few alterations on the tunic and vest to ensure the perfect fit.
Why make a stencil?
I made two different kinds of stencils for this project. One of the stencils is on a translucent “make your own stencil” plastic sheet and the other is on stick-on vinyl. Both styles are reusable (to an extent) but the plastic sheet version will outlive the vinyl version. The vinyl version sticks to the skin, which makes painting easier, whereas the plastic version needs to be taped or held down and it’s best to use this style with a friend to help.
Before I could even get to cutting the stencil, I had to design the stencil pattern in Illustrator (though you can use any graphics program or sketch the pattern by hand). Make sure to connect certain sections of the pattern so there are no floating pieces not attached to the stencil.
Normally, you have to flip the image before taping it down to the back of your vinyl or plastic and cutting, but in this case, the pattern is symmetrical.
(To demonstrate, the vinyl version is stuck on my arm, and the plastic version is taped to my mannequin’s arm.)
For my quick test, I used the vinyl version, which I stuck to plastic after using to keep it fresh for my next use. I used Mehron Paradise Makeup in Dark Blue and Wild Orchid mixed together. I also changed up a few details and adjusted line widths once I saw it on my actual arm. The stencil is perfect for the basic shape, but sometimes you still need to clean up edges and adjust. In my opinion, I thought this was a great test!
Thanks for joining me on my journey so far! And I’ll see you next week for lots of foam work!
- Mahou ☆
Hi Everyone!
This week my plan was to get all of the armor finished and out of the way so that I can move on and finish other important parts of the costume! I find that armor building takes up the most time and being able to get that part of the project complete will be vital to completing the rest. Katsucon is approaching swiftly and I want to make sure I stay on track!
My first order of business was to finish creating all of the Glow-in-the-Dark pieces of the armor. The last pieces I needed to create were the cone-shaped bits that sit on the shoulderpads and the shinguards. To create these, I bought acrylic ring holders and filled them with the glow-in-the-dark paint from before. This took about 2 days to dry completely, but totally worth the wait, because they look GREAT on the armor! Since they are acrylic, all you have to do is throw some heat of them, and heat up the Thibra and they stick together so well. They feel super sturdy on the shoulderpads and shinguards.
Next, I needed to figure out what I was doing with the belt and small waist pieces. I changed the sewing design and wanted to make sure everything looked okay, armor-wise. I put all of my armor on my mannequin to gauge the proportions and weight of the entire costume. I noticed that the armor was VERY top heavy (design wise, not literally) and there was a lot going on around the neck, shoulders, and bust area. In order to balance the design a bit more, I added small pieces of hip armor that the gems will be attached to. This adds a bit more bulkiness and weight around the hips and will hopefully balance out the costume a tad more.
Something I discovered that was EXTREMELY helpful for dangling gems are these Dog Collar Rings. They are basically mini key rings and if you link a handful of them together you can create chains. I prefer this over jump-rings because the jump-rings can open or snag on things and potentially fall off of your costume. These types of rings are more secure and can take more stress! I have been sandwiching these rings between the Thibra in different parts of my costume. Doing so, I can later attach chain or dangling gems to them - no glue required!!!
UNFORTUNATELY….. I ran out of foam, and couldn’t finish a couple pieces of armor. :( BUT, I ordered more and in the meantime, I have been priming the armor that is done to save some time.
Here are some photos of the majority of my costume on my “way-too-skinny” mannequin. You can see how top heavy it is, but the little bits of armor and detailing at the hip really help with the balance of the design! I’m starting to really see some good progress and a finish line to this project and I am SO EXCITED to wear this!
I hope everyone else’s projects are going swimmingly and can’t wait to see everyone next month at Katsucon! :)
Purchasing:
The first step is buying your fabric. Most fabric stores carry vinyls and pleather. Oftentimes the stretch vinyls will be grouped with fashion or special occasion fabric sections. Upholstery sections also carry vinyls and microsuede, but they are much heavier and usually don't have as much stretch. Vinyl can be pretty expensive, so usually it is a good idea to plan ahead and give yourself enough time to wait for a sale or coupon to use on your fabric purchase. If you are shopping online, be sure to order samples of your fabrics before making a big purchase, and be sure to check the return policy.
Ironing:
Most vinyls can melt when ironing directly, so a good trick to use on this or any other delicate fabric is to put a barrier in between. Some people use wax paper, but depending on the heat setting, there is a small chance the wax residue could transfer to the fabric. I personally like to use the same heavy drafting paper that I pattern with. You can find rolls for cheap in the painting section of most hardware retailers such as Home Depot or Lowe’s.
Whatever material you decide to use, be sure to test ironing on scraps of your vinyl at various heat settings to find the optimal configuration before you start ironing your cut pieces.
Mockup
When pinning or sewing a vinyl keep in mind that, unlike woven fabrics, all punctures in the material will remain forever. This can be intimidating because any mistakes may result in you having to recut your pieces. And since we all know how expensive vinyl can be, the first and most important step is to make a mockup of your outfit before even cutting out your vinyl pieces. Try to use a material that is cheap but has a similar thickness and stretch as the vinyl so you can have an accurate idea of how well your pattern will apply to your vinyl.
Pinning:
When pinning your vinyl pieces together, pin only in the seam allowance and not on your planned seamline. Fabric clips are a great investment, as they won't puncture your vinyl and are strong enough to hold most seams together until sewn.
Sewing:
Vinyl will want to grab your presser foot as you sew, causing the stitches to become uneven. There are specialized presser feet for use with vinyl that have less grip to them. You can alternatively apply scotch tape to the underside of your presser foot for similar results.
Some sewing machines will have specific stitch settings for vinyl to help with even stitches, but if yours doesn't, you can lightly pull your fabric from behind the machine with one hand as you sew to keep a steady traction. You should practice sewing on some scraps to get a handle on your specific vinyl before sewing the final garment.
Interfacing:
Sometimes you may find yourself using stretch vinyl for parts of a project that don't require stretch. Let’s say the texture/color vinyl you need only comes in a stretch variety, or your project requires the same fabric to stretch in some places and not in others. The easy solution for any stretch fabric is interfacing. Most fabric stores carry a variety of interfacing, from lightweight to extremely sturdy, and with both iron-on adhesive or non-iron-on options. When purchasing interfacing be sure to consider what the combined thickness of the interfacing and your fabric will be once combined, as this could affect the drape and function of your finished garment.
If you choose an iron-on interfacing then have the interfacing on top to act as your barrier between the iron and vinyl (and again remember to test on a scrap first). If you choose a sew-on interfacing, you will want to cut your pieces out and carefully pin the interfacing to your vinyl while both are lined up flat on a table. You will sew the two together with a topstitch in your seam allowance. This way it won't be visible once the outfit is sewn together.
]]>Hi again and welcome back!
This week (which is probably my favourite week yet!) I styled Runaan’s wig, attached the horns, and even did a quick costest/makeup test!
Last week I finished up the horns, primed them with Flexbond, and painted a wood grain texture on them. I wanted to keep with my goal of making this entire cosplay more realistic and not flat at all. I’m not a painter by any means, so I experimented with wood grain painting on a piece of cured Foam Clay that I treated and primed the same way as my horns. The horn adornments are made with Arda Wigs Canada’s new Form-Lite EVA Foam (3MM)! It shapes beautifully and was great for etching into for the textured designs.
I attached the horns to the wig by gluing them to a white/translucent headband so it would blend well into the white wig. The headband is wide enough to support the horns, and it helps that they’re super light because they’re made out of Foam Clay! The headband gets built into the wig within the first few steps.
The wig that Arda Wigs Canada sponsored me with to create this style is a Tauriel in Pure White. For the styling, I altered the lace front widow’s peak to make it less harsh, trimmed a bit of the length from the front, and created his braid and ponytail style in the back.
Note: There’s a point where I used parchment paper to block my horns while I hair-sprayed the wig. This is because Got2b Glued leaves a sticky and not-so-nice residue, and I wanted to protect my horns!
You can watch me style it here!
I slipped the wig on and played around with my makeup for a quick costest! I chose to use purple and red tones as eyeshadow. Then I mixed two Mehron Paradise Makeup colours (Dark Blue and Wild Orchid) together to create the perfect indigo colour for the face and tattoo markings.
Thanks for joining me on my journey so far! And I’ll see you next week!
- Mahou ☆
]]>Hi Everyone!
This week I worked on some of the sewing section of the Light Fury Costume. I started this week by creating the bodysuit, but once I started to get into patterning the skirt, I realized that I wanted to redesign some of Zach Fischer’s original design. Since I am trying to portray a different gender in this costume, I want to create a skirt that puts more emphasis on silhouette, so that I can give the illusion that I have more curvature. Looking at reference photos from when Jessica Nigri created this costume, the skirt that she created seems to lay flatter than the one in Zach Fischer’s design. In order to create a skirt that flares out so much, it would need some sort of wire in the seams in order to keep it flared out. Unfortunately, I do not think this will look too great without making the skirt out of really thick fabric nor will it be very mobile at a convention. Therefore, I have come to the decision to just redesign some of the sewing portions of this costume. So, throughout the week I was thinking about different types of skirts that would go well with the rest of the costume design. Additionally, I think I may be creating some matching gloves and thigh highs later on if I have enough time.
BODYSUIT
Here is how I started out the bodysuit/leotard:
(I am using a scuba knit material that has 2-way stretch)
I started out by flat patterning my measurements onto paper. The piece on the left is for the back of the leotard and the piece on the right is for the front of the leotard. I only patterned half of these patterns because I planned to cut these pieces of the fold (I found out later that I need to add a center front and center back seam in order to fit my body better). Now, for this bodysuit I decided to change the design of the top portion because I do not have a female bust; therefore, I added a deep V-cut that will meet the middle my armored breastplate. Not only will this allow me to hide padding for my bust under the bodysuit, but the deep V-cut will allow me to contour on some fake cleavage.
Before sewing the bodysuit together, you must first add on the details to the fabric pieces. This is important, because if you try and add details later, it will be extremely difficult to finagle the bodysuit through the sewing machine. Additionally, you won’t be able to have your details flow into the shoulder seams. I added blue stripes with the same scuba knit material and top-stitched them to the front and back pieces.
After all the details were added, I sewed the shoulder seams and side seams together and proceeded to do a fitting to see if everything fit properly. Once I put on all my pads and corset I was able to see how the garment fit. In this fitting there was loose material in the center front and center back, therefore I needed to add curved seams in the center front and back to make the bodysuit fit properly. After that, I re-fitted and it fit perfectly! Then, I was able to finish the bodysuit by adding hems everywhere and snap attachments to the bottom.
Next, I moved onto designing the skirt. I noticed many wing-type motif icons in Zach Fischer’s design, so I wanted to accentuate those more in the fabric rather than just the armor details. I wanted a small skirt that only goes ¾ of the way around my body, attaches the the belt, and opens up in the front. So, I patterned this design that kind of looks like bat wings for the skirt that will hopefully look folded up dragon wings when worn!
Next, I cut the fabric on the fold out, using the white and blue fabric. I cut it out of both fabrics because I want the lining of the skirt (on the inside) to be blue, where the outside is white. I proceeded to add stripes onto the white piece of fabric before sewing everything together. Lastly, I sewed the white and blue “bat” shaped pieces together and flipped them inside-out and closed everything up with a top stitch.
Here is the finished bodysuit and skirt, and I think the new skirt design is SUPER cute and will look really fun with all the armor around it as well! Later on, I think I want to add a pair of matching opera length gloves, and matching thigh high boot covers that all have these stripes on them as well. Also, Light Fury has these small little circular scales just like Night Fury does, so I may try and add those into the design somewhere as well.
Sorry if the end here is a little scatter-brained! I am super excited to design new portions of the costume and the design part of my brain is just going crazy with ideas. Hopefully, I can get enough done to where I can do an entire fitting test soon and show everyone how all of the pieces of the costume go together!!!
]]>Have you ever wondered why sleeves are shaped bigger than the armhole they are being sewn into? Well, there's a reason for that, and I would like to show you how to get your sleeves on in a few easy steps!
First, make sure to mark your sleeve appropriately so that you sew it onto the correct side. Most patterns will have small triangles or notches on the sleeve cap that correspond to the armhole.
Set your sewing machine to a wide straight stitch, and carefully sew a line in the seam allowance close to but not quite on your planned seam. Sew a second line in the seam allowance next to the first. Leave one end of the lines loose and untrimmed. This is called an ease stitch.
Carefully pull the loose end and "ease" the fabric over towards the tied end. Do this a little bit at a time, and smooth it out as shown in the video. You want your ease stitch to pull your sleeve cap into a slight dome shape, but not tight enough to pucker.
Pin your sleeve to your armhole, starting with the notches and meeting around the top middle of the shoulder cap. Adjust the tightness of your ease stitch off needed to line the seam edges up with each other.
Carefully sew the sleeve on. If your sleeve is a single piece pattern you can leave both your sleeve and jacket base open while sewing together, and stitch the side seams shut afterward. If you have a two-piece sleeve, you will need to sew the sleeve together first, as well as the jacket side seam.
If any puckering exists after stitching, you can carefully seam rip that section and resew. The ease in that area may need to be spread out more to get rid of the puckering.
After sewing your sleeve on, you can use an ironing ham to help hold the shoulder cap shape while flattening the seam edges. If you want to be extra fancy, you can topstitch your seam allowance into place.
]]>
Welcome back and I hope everyone had a beautiful holiday season and a happy new year!
I hope you enjoyed my four-fingered glove pattern from before the holidays! Let me know if you used it or even just experimented with it!
This week I’ve been working on my horns for Runaan, which is exciting for me because it’s actually something I’ve never done before! Though I’m inexperienced in accessories like this, I was immediately sure I knew how I wanted to tackle them.
Image courtesy of The Dragon Prince
One of the amazing products that Arda Wigs Canada carries is Lumin’s Workshop Foam Clay. This product is an air-dry clay that cures to EVA foam after 48 hours! Once it’s properly cured, the foam clay dries into a high density, but also ultra lightweight foam you can cut, sand, heat form and glue to other costume pieces! I knew this would be perfect for sculpting the horns.
What I’ve found from working with it is that it’s very intuitive. At first I was worried I wouldn’t be able to sculpt the foam into the exact shape I wanted but the more you pat it (don’t pull and smudge it, pat it!) the smoother it gets and the better, more controlled shapes you can make.
The base of my horns are made with 22 gauge wire that I looped at the end and stuck into my foam wig head. Then, I shaped tinfoil around the wires into the basic shapes I wanted the horns to be sculpted into. I kept them smaller than I wanted the end result to be, as I know my foam clay layers would increase the size. I taped them to my wig head, which I will just be cut off when I need to remove them.
Watch below to see me sculpting one of the horns!
Once the horns are completely cured this weekend, I can sand out any imperfections, seal them with Flexbond and then paint them! I’ll also be making the base adornments with eva foam.
You’ll see the final product next week when I attach them to my wig!
Thanks for reading! And I’ll see you next week!
- Mahou ☆
Hi Everyone!
This week I have been working on the armor for Light Fury. I am going a little off of my scheduled calendar, but that’s okay because I got really into building the armor! Instead of working on any sewing this week, I mainly focused on armor building and detailing, and will hold a whole week to sewing later on.
ARMOR CONSTRUCTION
The first step for building the armor was transferring all of my pattern pieces into craft foam. For this piece in particular, the shoulder pad, I needed to create darts in the pattern for more roundness in the final shape. So, I made sure to cut all the darts out and glue them together with super glue before moving into the next step.
Next, I moved into the thermoplastic stage - for this stage I will be using Thibra for my armor. This step is the hardest for me because it always look a bit shabby and messy, but it always gets cleaned up with detailing later! I am using the “Wrapping” method with the Thibra instead of the “Sandwiching” method in order to achieve this base structure for the armor. You can really use either method, but since I am using foam for my detailing, my base doesn’t need to be so rigid.
After the base is complete, I start with the large details first. Since this shoulder pad has two tiers to it, I wanted to lay down any details that would sit underneath the second tier. Otherwise, the details that sit underneath the second tier would be difficult to get to later on.
The foam edging I am using is from TNT Cosplay Supplies. They started selling beveled foam edging for really cheap, and it is AMAZING! I am using super glue to adhere everything together, and it has made my armor building process so much quicker!
Next, I just went to town on the rest of the details of the piece of armor. I used a mix of craft foam and the beveled edging for all of the detailing. During this step, I would also add any gems onto the armor piece, but the material for the spikes I want to add on these shoulders have yet to come in!
GLOW IN THE DARK GEMS
To add some extra dimension to the costume, I wanted to create glow in the dark gems. In the trailers for the movie, Light Fury’s eyes light up so bright in some of the dimly lit scenes, so I wanted to recreate that effect with the gems of the costume.
In order to create these gems, I bought a bunch of different sized clear glass cabochons that are used in pendant making. I found these on Amazon along with some glow-in-the-dark light blue paint.
Basically, all I did was paint the glow-in-the-dark paint onto the back of the cabochons, but since the paint is a bit see-through, I decided to top it off with some purple paint as an opaque background. The glow-in-the-dark paint is very shear, so I used about 7 coats just to make sure there was enough!
Lastly, I added some craft foam details and stuck them onto any armor pieces that needed them! Here in the photo you can see how much they glow! It is super fun to play with!
Here is a photo of some of the things I have finished this week! I started to dabble into painting because I got really excited about the color scheme and wanted to test some paints. However, more on painting will come later on! Hope you all enjoy and hope all of your holiday seasons were amazing! :)
]]>This week I was able to construct all of the mock-ups for the rest of our models. A couple of them were able to try on their mock-ups and I took notes and made adjustments accordingly. I also dyed the jacket fabric for Madi and myself. I decided to try both pot dyeing over a stove and dyeing in a washing machine in order to show the strengths and weaknesses of each. I have a detailed breakdown of the process and results below.
Don't forget to tune in to our stream next week, where I will be to sewing together the jackets.
For the pot dyeing, I started with samples to determine the best ratio of dyes and water for the color that I wanted. I noticed that it was very easy to make adjustments on the fly for the mixtures in a pot. Dyeing in a washing machine can be trickier due to the larger volume of water being utilized. Both processes are potentially lengthy and require patience to achieve the desired results. After I achieved the desired shade, I soaked my fabric in water to help it dye evenly and put all of my jacket pieces into the dye pot.
I ended up with an uneven dye result, possibly due to the pot size or the amount of time that the fabric was sitting in the dye bath. A longer dye period would likely have yielded a more even result. I had also pre-cut my pieces to minimize fabric in the pot, but this resulted in very frayed edges. If you decide to pre-cut your fabric before dyeing, I recommend giving yourself a very large seam allowance, both for the fraying and for any fabric shrinkage that may occur.
For the washing machine dye method, I chose to leave the fabric uncut. I laid all pattern pieces out to make sure that I had the right amount of fabric. I followed the instructions on the dye bottle by adding a cup of salt to the dye bath and using the hottest water setting. I set my machine for a medium load to replicate the amount of water to dye ratio in the pot. I had to reset the wash cycle to extend it to the desired length of time recommended on the bottle. After the dye bath cycle finished, I ran the wash again with detergent to get rid of excess dye in the fabric. After that, I ran the washing machine one final time empty with bleach and detergent clean away any remaining dye residue in the washing machine basin.
After drying, the fabric turned out a little on the lighter side, so I repeated the dying process one more time with a new bottle of dye. This time the results were good, and the fabric can now be cut into the jacket pieces.
In both types of dyeing I wasn't able to get the desired result on the first try. Dyeing fabric is a constant process of trial and error with varying results. But don't be afraid to give it a try for yourself. As long as you allow yourself room for errors and time to learn, you should be able to conquer any dye challenge in the end. I hope my experiences this week may be of use to you, and I wish you all luck in your future dyeing projects!
]]>Artwork by Zach Fischer Designs
Hi Everyone!
This week I have been designing the makeup for Light Fury and playing with different body shapes with padding. The makeup design I have been working with is very similar to the Zach Fischer Design, but a bit more detailed and ‘extra.’ Also, by playing around with a couple different body shapes, I have come to the conclusion that a slightly curvy body shape is most appropriate for this costume.
For my look, I have taken inspiration from the white dots on the cheek and the slightly purple tinted contour of the artwork. I wanted to amplify these qualities and really have fun with them. In my design, I really brought color into the cheeks and parts of the forehead and blended a blue pigmented highlight into them to really bring out the cheekbones. Also, I added pearls to the cheeks to give dimension and more highlight as well. There were two major changes I made with the design:
For the body, I played around with my padding, and thought about the important pieces of the costume that needed the shape emphasis. There is a bunch of detail and design on the artwork breastplate, which makes me think padding out my own breast will be important to fit in all of these details. Secondly, there are a couple belts and some fabric at the hips, which makes them look larger. So, instead of padding large hips, it may be more realistic to pad smaller and rely on the costume to give more shape. Lastly, I think the most important part of the understructure is wearing a corset. Not only will it help with the majority of the shape, but it will help with the wings! Wearing a corset will give me a sturdy base to attach a backplate to the costume where the wings will attach. That will be most important for the wings to function properly.
Lastly, the next things I need to work on in my makeup look will be getting contacts and the wig! I think silver/grey contacts and a silver/grey wig will be best to tie everything together!
Here is more of an elaboration onto the understructure and padding I will be wearing for Light Fury. Creating a proper silhouette for any drag character is imperative for selling the illusion of the character transformation. Being able to change your body’s appearance is a major key in cosplaying a different gendered character.
This photo shows the silhouette I have achieved with my padding and corset. I have been playing around with a bunch of different shapes, but this silhouette I have found to be most successful and flattering for my body shape.
Bust: For the bust, I am wearing a black bra with cup size C, which is padding out with 3 circular foam bust inserts in each cup. Since I have broad shoulders, padding the bust out can help proportion my body properly.
Waist: For the waist, I am wearing a size 24 mesh corset from Orchard Corset. This corset is nice because the mesh is thin and is easy to hide underneath clothing.
Hip: For the hips I have created foam hip pads that are placed underneath 8 pairs of tights. I like to wear a large amount of tights to really hide the lumps of the padding in order for the silhouette to be more seamless. However, I may end up wearing less because the costume does cover much of this area.
Overall, this is the silhouette I plan to use with the costume. However, I may invest in a nude bra and corset color if the black shows through the white leotard that is drawn in the costume’s original design.
]]>
Welcome back everyone!
I’m so excited to share what I made for you this week! I worked on more sewing, focusing accessories like boot covers and gloves. As a cosplayer, my main goals are always to educate, mentor and inspire, so my treat for you this week is a downloadable .PDF pattern for Runaan’s gloves!
“Why are they so special?”, you may be asking. Well, that’s because these gloves are meant to comfortably fit four fingers, for Moonshadow Elf character accuracy!
Image courtesy of The Dragon Prince
I encourage you to download and try the pattern for yourself! Shoutout to the Arda Wigs Canada graphics team for working with me to digitize and provide the pattern to you all for free. We request that you include us (Ali Mahou and Arda Wigs Canada) in your credits when you use the pattern, but we also want you to know that it’s completely free for use, even if you’d like to sell your sewn, final product. In the spirit of sharing cosplay knowledge and encouraging one another, let's keep this pattern free for all.
The pattern is licensed under the Creative Commons Attribution-ShareAlike 4.0 International
License. For more information and to view a copy of this license, visit http://creativecommons.org/licenses/by-sa/4.0/.
PATTERN INSTRUCTIONS AND INFORMATION:
NOTES (PLEASE READ!):
LET’S MAKE GLOVES!:
Example: Gusset “A” matches with finger space “A” and you have to match the ORANGE diamond on the gusset to the ORANGE diamond on the main glove and the GREEN square on the gusset to the GREEN square on the main glove etc.
*Take your time with this step! If this is too small of an area to sew with your machine, you can always hand-sew.
And here it is!
If you’d like to adapt this for Rayla cosplay, I would use a thick spandex or scuba knit fabric in the same colour as your skin, and adapt the pattern by tightening the fit, and shortening the arm length to reach just past the wrist so it can be hidden in her arm bands!
Thanks for reading! And I’ll see you after the holiday break! Have a beautiful holiday season and don’t forget to work on your own WWWIP project!
- Mahou ☆
]]>