

WWWIP 2019 Week 4: Kyle
Published: 2/1/2019Hello everyone!
This week I was able to construct all of the mock-ups for the rest of our models. A couple of them were able to try on their mock-ups and I took notes and made adjustments accordingly. I also dyed the jacket fabric for Madi and myself. I decided to try both pot dyeing over a stove and dyeing in a washing machine in order to show the strengths and weaknesses of each. I have a detailed breakdown of the process and results below.
Don't forget to tune in to our stream next week, where I will be to sewing together the jackets.
For the pot dyeing, I started with samples to determine the best ratio of dyes and water for the color that I wanted. I noticed that it was very easy to make adjustments on the fly for the mixtures in a pot. Dyeing in a washing machine can be trickier due to the larger volume of water being utilized. Both processes are potentially lengthy and require patience to achieve the desired results. After I achieved the desired shade, I soaked my fabric in water to help it dye evenly and put all of my jacket pieces into the dye pot.
 |
 |
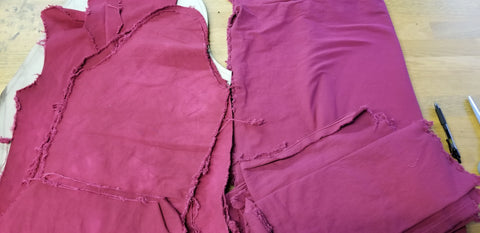
I ended up with an uneven dye result, possibly due to the pot size or the amount of time that the fabric was sitting in the dye bath. A longer dye period would likely have yielded a more even result. I had also pre-cut my pieces to minimize fabric in the pot, but this resulted in very frayed edges. If you decide to pre-cut your fabric before dyeing, I recommend giving yourself a very large seam allowance, both for the fraying and for any fabric shrinkage that may occur.
 |
 |
For the washing machine dye method, I chose to leave the fabric uncut. I laid all pattern pieces out to make sure that I had the right amount of fabric. I followed the instructions on the dye bottle by adding a cup of salt to the dye bath and using the hottest water setting. I set my machine for a medium load to replicate the amount of water to dye ratio in the pot. I had to reset the wash cycle to extend it to the desired length of time recommended on the bottle. After the dye bath cycle finished, I ran the wash again with detergent to get rid of excess dye in the fabric. After that, I ran the washing machine one final time empty with bleach and detergent clean away any remaining dye residue in the washing machine basin.
 |
 |
After drying, the fabric turned out a little on the lighter side, so I repeated the dying process one more time with a new bottle of dye. This time the results were good, and the fabric can now be cut into the jacket pieces.
 |
 |
In both types of dyeing I wasn't able to get the desired result on the first try. Dyeing fabric is a constant process of trial and error with varying results. But don't be afraid to give it a try for yourself. As long as you allow yourself room for errors and time to learn, you should be able to conquer any dye challenge in the end. I hope my experiences this week may be of use to you, and I wish you all luck in your future dyeing projects!


